So I went back to the drawing board and redrew my list. This time, more British/Hanoverians, a drop of quality for some, the loss of the Prussian Landwehre.
It was a good game. Luck was mixed with Andrew I think suffering the pointy end of the stick this time with his reserve force only arriving on the very last die throw, Which I think, and Andrew concurs, saved him from a fighting retreat and a moral victory to me (can't have that can we).
All of Andrew's comments are
italics, reads far better than my diatribe.
This time around I modelled my list
on a small Line Corps from the late 1813 campaign. My two Infantry Divisions
each had a six pounder battery and two Brigades of four battalions, except for
one Brigade which had five. One Brigade in each Division had two light infantry
battalions, all the rest of the battalions were line. I have often read the
infantry battlefield performance was quite good, although their march
discipline was less so. The raw recruits are assumed to have fallen out during
the hard marching typical of the campaign and leaving the better troops on the
battlefield. This seemed to justify rating everything as ‘trained’. I
consolidate the howitzers from the divisional batteries into a small composite
battery to give me a reserve and leaving the rest of the guns with their
Divisions. If the infantry was balanced the cavalry was not in such good
condition. I fielded a ‘light’ cavalry brigade made up of a ‘trained’ Regiment
of Lancers supported by a ‘veteran’ Regiment of Dragoons. This would leave me
painfully short of scouting capability – faithful to the 1813 period but a poor
choice from a gaming perspective. To add a little colour and give the list some
punch, I had a Brigade of heavy cavalry in support. The Regiment of Carabineers
and Regiment of Cuirassiers should help keep the numerous high quality cavalry
my opponents typically fields from dominating proceedings.
Not much terrain to speak of. Two
hamlets positioned right on my base line and a small knoll in from of my left
flank. My opponent had similar built up areas on his baseline, but a ridgeline
extending half way across his front on his left and a river cutting off his
right flank. So to deployment: not surprisingly I am out-scouted again so I
deploy first. Best fields of fire are on my left so I put most artillery there
with the howitzers opposite the hamlet in case he decides to hide in there. He
has a fairly good defensive position so it is possible he may just sit back in
the ample cover until he wears my exposed infantry down with artillery fire and
then mop up the survivors (I would be inclined to do that in his position). On
that basis, a not a very inspiring deployment seems the best option: three
infantry brigades deployed across the front in line with the artillery, with
the fourth held back on the right which is anchored on the left most hamlet. So
he can’t deploy masses of artillery opposite them, my light cavalry is held
back on my centre-left and the heavy cavalry off table in reserve.
The Anglo-Germans deployed in
similar fashion with one battery opposite each of the hamlets on my base line
and wall-to-wall infantry in between. His centre Brigade was made up of large
British battalions, his right some (over rated) Hanoverians, and his left
Prussians. He choose the flank cluttered by the most terrain to deploy two
regiments of Prussian cavalry and I knew by his scouting strength there was
more cavalry off table. The open flank (my left) seemed the best destination,
especially since this tactic had worked for him last game. His deployment was
somewhat perplexing. Despite the terrain, the position of his troops didn’t
lend itself to a defensive battle and he certainly seems to have a preference
for being offensive.
My plan would be to push my right up
to encourage his centre to stay behind the reverse slope and attack on my left.
If I could encourage his right to come forward, the river cramping his
deployment should mean he will be overlapped – if he sits back I will try to
punch through with a combined infantry-cavalry attack instead (the cavalry
being provided by my lights). As a precaution I would leave a couple of
battalions in square as a flank guard to disrupt any flank marching cavalry. If
his left advanced, the terrain and a few battalions from my depth Brigade could
slow him down and perhaps hold him off until things could be decided on the
other flank. As soon as possible, I would get my heavy cavalry on table around
the centre and hopefully deliver a crushing blow.
I'll post the list I took shortly, once I access the other PC for the files. (And here it is.)
| Prussian
Brigade |
|
|
|
|
| Headquarters |
|
|
|
|
| General Staff |
1 |
Command Element |
100 |
100 |
| Brigade Commander |
1 |
Prussian Staff |
50 |
50 |
|
|
|
|
150 |
| Prussian Brigade |
|
|
|
|
| Commander |
1 |
Prussian Staff |
50 |
50 |
| Foot Battery |
12 |
Trained Gunners |
5 |
60 |
|
4 |
Light Medium Guns |
25 |
100 |
| Musketeer Battalion #1 |
10 |
Veteran Line Infantry |
6 |
60 |
|
2 |
Skirmish |
7 |
14 |
| Musketeer Battalion #2 |
10 |
Veteran Line Infantry |
6 |
60 |
|
2 |
Skirmish |
7 |
14 |
| Musketeer Battalion #3 |
10 |
Veteran Line Infantry |
6 |
60 |
|
2 |
Skirmish |
7 |
14 |
| Musketeer Battalion #4 |
10 |
Trained Line Infantry |
4 |
40 |
|
2 |
Skirmish |
5 |
10 |
| Musketeer Battalion #5 |
10 |
Trained Line Infantry |
4 |
40 |
|
2 |
Skirmish |
5 |
10 |
| Musketeer Battalion #6 |
10 |
Trained Line Infantry |
4 |
40 |
|
2 |
Skirmish |
5 |
10 |
|
|
|
|
582 |
| British Brigade |
|
|
|
|
| Commander |
1 |
British Staff |
50 |
50 |
| Foot Battery |
12 |
Trained Gunners |
5 |
60 |
|
4 |
Light Medium Guns |
25 |
100 |
| Musketeer Battalion #7 |
18 |
Scots Veteran Line |
6 |
108 |
|
2 |
Skirmish |
7 |
14 |
| Musketeer Battalion #8 |
18 |
Trained Line Infantry |
4 |
72 |
|
2 |
Skirmish |
5 |
10 |
| Musketeer Battalion #9 |
18 |
Trained Line Infantry |
4 |
72 |
|
2 |
Skirmish |
5 |
10 |
| Musketeer Battalion #10 |
18 |
Trained Line Infantry |
4 |
72 |
|
2 |
Skirmish |
5 |
10 |
|
|
|
|
578 |
|
|
|
|
|
| British Brigade |
|
|
|
|
| Commander |
1 |
British Staff |
50 |
50 |
| Musketeer Battalion #10 |
10 |
Trained Line Infantry |
4 |
40 |
|
2 |
Skirmish |
5 |
10 |
| Musketeer Battalion #10 |
10 |
Trained Line Infantry |
4 |
40 |
|
2 |
Skirmish |
5 |
10 |
| Musketeer Battalion #11 |
10 |
Trained Line Infantry |
4 |
40 |
|
2 |
Skirmish |
5 |
10 |
| Musketeer Battalion #12 |
10 |
Trained Line Infantry |
4 |
40 |
|
2 |
Skirmish |
5 |
10 |
|
|
|
|
250 |
|
|
|
|
|
| PrussianCavalry Brigade |
|
|
|
|
| Commander |
1 |
Prussian staff |
50 |
50 |
| Hussars |
9 |
Veteran Hussars |
12 |
108 |
| Dragoons |
9 |
Veteran heavy cavalry |
12 |
108 |
|
|
|
|
266 |
|
|
|
|
|
| British Cavalry Brigade |
|
|
|
|
| Commander |
1 |
Prussian staff |
50 |
50 |
| Hussars |
9 |
Veteran lancers |
12 |
108 |
| Dragoons |
9 |
Veteran heavy cavalry |
12 |
108 |
|
|
|
|
266 |
|
|
|
|
|
|
|
Points Spent |
|
2092 |
|
|
Scouting Value |
|
36 |
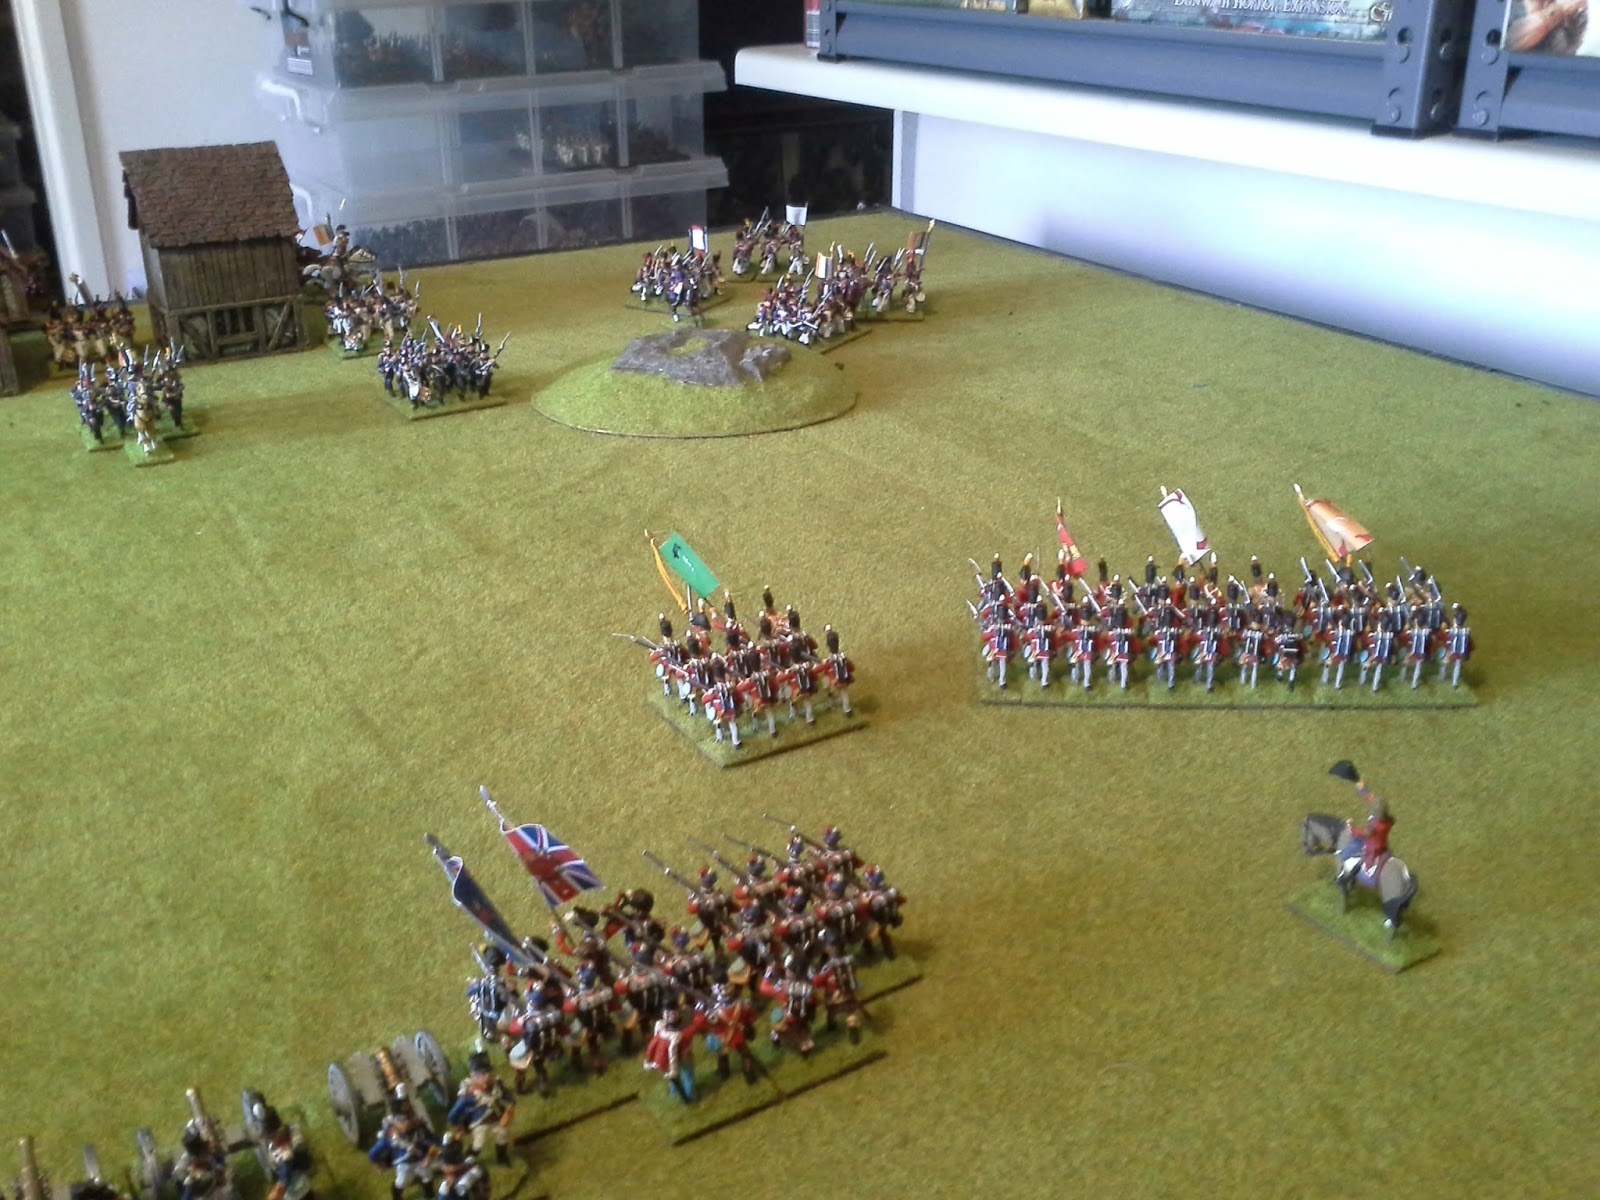
The first lot of photos are the side view, which gives the flow of the game in play. The left flank (from the Prussian perspective) is clear to identify for point of the battle, regrettably the other flank, being further away is harder to explain or show. There will be another section of photos after the side shots that will explain some of the other flanks actions.
 |
1: french on the left, prussians on the right. Is this how the political
viewpoint is as well? |
As
planned, the French open with a general advance along the front.
 |
2: The Prussians spot a vacant bit of land and make a dash to expose
the enemy flank. I also expected the french reserve to appear here.
|
British to my left and an dark mass
of Prussians start to emerge on my right. Rather ominous on the 200th
anniversary of Waterloo. On my left, the Hanoverians obligingly abandon the
security of the river covering their flank. This serves to reinforce my
assumption of a flank march – I expect he needs to push up so when they arrive
the cavalry and infantry are close enough to support each other.
 |
| 3: the french off to annoy the Prussians. |
As
the Prussians push over the ridge, time to wheel my depth Brigade to their
right to present an even front. My plans for the howitzers to provide some
support diminish rapidly as they take several hits for the battery opposite
during the next few turns.
 |
| 4: Crossing the pass. Cavalry deployed ready for trouble. |
Another
march straight ahead and a left wheel would see the Prussians deploy into their
doctrinal attack formation. I occupy the hamlet and deploy some battalions into
line to make sure they get a text book reception.
 |
| 5: Major inroads. french confidently advancing - fearing nothing. |
I once read a remark by a German
WWII officer saying it is a waste of time studying American tactical doctrine
as the Americans neither understand nor employ it. My opponent deploys his
cavalry into line seems to intend pushing the whole lot into a gap wide enough
for half the numbers.
 |
| 6: Prussian artillery in danger. Advances all around. |
My
centre pushes forward and I peel off a battalion to try to deal with the
Prussian artillery. Having advanced behind the cover of the ridge they have no
casualties so far.
 |
| 7: More posturing. |
On my left the infantry shake out
into ordre mixte supported by my cavalry. The enemy off table arrival is
declared – on his base line. At least my flank guard is freed up to join the
general advance against the Hanoverians. My reserve are called up but fail to
arrive.
 |
| 8: Prussian battalions breaking up to counter french intentions. |
Suspecting he may be
leading with his cavalry, my forward battalions form square. His Hussars face
the vacant baseline in obvious anticipation on my reserve arriving. His
Prussian infantry continue a very unsophisticated attack from the line of march
in battalion column against my right. No real indication of any plan other than
to attack. Alt Vorwaarts would be proud. His centre deploys the huge
British battalions into line a quickly cover the whole front. On my left we
start to make an impression on the Hanoverians.
 |
| 9: Prussians go to line and attempt to "out shoot" the french, |
The Prussian advance ends in another
long line, blocking their cavalry. I have no idea what they are doing. My
battalion attack on his battery ends in failure under the weight of canister
and flanking fire form the British infantry. His cavalry arrive to bolster the
Hanoverians on my left. Things are so tight there are no gaps to get them
forward, giving me time to arrange a reception by my light cavalry.
 |
| 10: Trading musketry. Casualties mounting. Right flank a little flaky. |
Still no reserve and casualties
starting to mount. The left starts to look a little shaky. The French seem to
be getting the best of the musketry exchange, but they need to being
outnumbered two to one. In the centre, going over the hill into short range
musketry seems a little desperate. They show no inclination to come this side.
Although the grind is wearing the French down and they have the numbers,
holding on for a decision of the left or the arrival of the reserve seems
the best option. Things are going much better on the left. Their frontal
attacks on formed infantry are comfortably repulsed – their infantry is
starting to fall back having taken heavy casualties.
 |
11: Prussian Dragoons ready to charge. Must remember that they
don't operate like light cavalry (Andrew caught out as well). |
Still no reserve. The Prussian
Dragoon form column so they can get through the gap at my infantry. The French
remain in column leaving square until the last moment, expecting to get the
benefit of fire on any Prussian charge from the infantry in the Hamlet.
 |
12: The french reserve arrive on the last chance die roll.
4 - 1's rolled for each attempt to arrive, and I complain about my luck! |
At last – the reserves arrive. Just
as well – the Prussian heavy cavalry punch through the French infantry who flee
towards the baseline. The Cuirassiers deploy to counter, while the Carabineers
give the Prussian Hussars something to think about. They were in the process of
going to column to follow their Dragoons through the gap when the reserve
finally turned up. They redeploy into line to face the oncoming heavies. On the
other flank, the British cavalry manage to pick off an exposed infantry
battalion. The French cavalry move forward to counter. Fortunately there is
plenty of room over there as the Hanoverians who can’t retreat are dead. The c
entre just grinds away at each other.
 |
| 13: french cavalry reserve engage the Prussians. |
I expect the reserve to make short
work of the Prussian cavalry, but probably too late to help. My infantry is
depleted on this side, so even though I will be able to force the Prussians
into square once my victorious cavalry are rallied there will be no infantry to
exploit the advantage. The right has stalemate written all over it. Similarly
in the centre: the musketry grind goes on with no clear advantage. On the left
I should be able to win eventually, cleaning up the rest of the infantry and
exposing their guns while the French ‘light’ cavalry confronts theirs. I think
there is a good change the French will over there win eventually, but they will
sustain fairly heavy losses in the process.
In the end my left flank was feeling secure, my right was not so great, though my cavalry might have been able to remain, however I was down to only 1 almost full strength battalion. Andrew and I discussed and agreed upon a Draw, though I think it was turning against me on the whole. But that's just me looking at my tactical ability and luck.
Having smashed each other fairly
well, a draw seems a reasonable result. If it was a campaign I’d be happy to
slink off under cover of darkness and regroup. The surviving French cavalry
would be able to discourage any pursuit. On balance I was pretty happy with the
outcome: had my reserve not appeared when they did my right would have
collapsed leaving him with reasonably strong infantry and cavalry to roll up
the rest of the line. Had they come on when they were first called up who knows
what would have happened. My opponents less-than-subtle persistent frontal
assaults are hard to defuse and definitely in keeping with the Prussian style
of attack, if lacking their doctrinal flexibility. Still, the French had a
disadvantage in weaker cavalry over 1813-14 and were ground down by weight of
numbers so we certainly can’t complain from a historical simulation
perspective. By way of lessons learned from this one I certainly think I
double-bluffed myself trying to anticipate his intentions. Maybe next time I
will just assume an ‘up the guts with lots of smoke’ sort of approach. Maybe
next time he will be super cunning. Maybe I’m over-analysing again. Maybe not.
 |
| 14: french line advancing. My Prussians advancing to support. |
 |
15: My Scots bounced and fled (though rallied at end). Feeling
a little threatened, but thinking I can hold this. |
 |
16: Adopting line to slow down the french. My artillery reduced
the attackers in the end to 1 figure. |
 |
| 17: Some fleeing British, The Cavalry set up for attacks. |
 |
| 18: The flowing lines of gun lines. |
 |
19: The lone frenchman and the artillery.
Game called before his fate was decided! |


No comments:
Post a Comment